How To Build A Small Home Garage Workshop
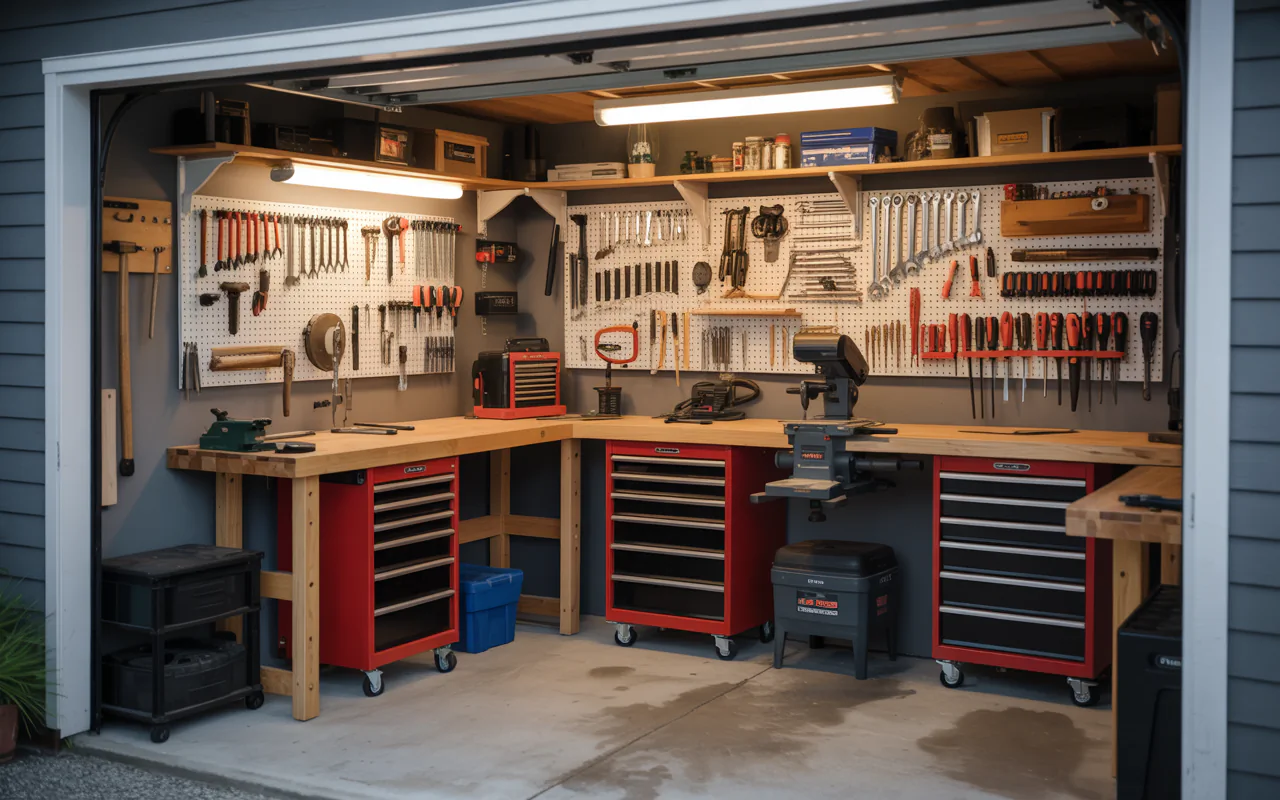
To build a small home garage workshop, start with a clear plan, basic tools, good lighting, and smart storage. This step by step guide helps you create a safe, budget friendly DIY space in any garage.
Many people dream of having their own workspace at home. You might love fixing things, making furniture, or repairing your car. But you do not have a big shed or a separate building. That is okay. Your garage can become that workshop. You can build a small home garage workshop even if your garage is tiny or shared with a car. I have done it myself, and I will show you how.
The key is to be smart with your space. Do not try to copy a huge professional shop. Focus on what you need. A few good tools, a solid workbench, and smart storage can turn any garage into a place where you enjoy working.
In this guide, I will walk you through ten simple steps. You will learn how to plan, clean, choose floors and lights, build a bench, pick tools, store everything, handle power, manage dust, and stay safe. Let us get started.
“The best workshop is not the biggest one. It is the one that fits your work and your habits.” – David Picciuto, woodworker and creator of Make Something
Why Build a Workshop in Your Garage?
Your garage already has a door, a roof, and some walls. That means you save money on construction. You also have easy access to your house for water or bathroom breaks. Working in your garage lets you step away from family noise but still stay close.
Another big reason is convenience. You do not have to drive anywhere to fix a broken chair or build a shelf. You can work for 15 minutes after dinner. Over time, those small sessions add up to real projects. Plus, having your own workshop can save you money on repairs and home maintenance.
But a garage also has challenges. It can be cold, dusty, and cluttered. Car tires bring in dirt. Tools get lost. That is why you need a plan. You need to build a small home garage workshop that works for you, not against you.
Step 1: Plan Your Space
Planning is the most important part. Do not just move boxes and start hammering. Take time to think. Walk around your garage with a notebook. Write down what you want to do in your workshop. Woodworking? Metal work? Car repairs? Electronics? Each hobby needs different tools and space.
Measure Your Garage
Get a tape measure. Write down the length, width, and height of your garage. Note where the garage door tracks are. Mark windows, doors, electrical outlets, and water heater location. These things cannot move. They will affect where you put your bench and shelves.
Draw a Simple Floor Plan
Use graph paper or a free online tool. Draw the shape of your garage. Add the fixed objects. Then think about zones. A zone for messy work like sanding. A zone for assembly and measuring. A zone for tool storage. Leave a path to walk and to open your car door if you still park inside.
Here is a simple table to help you decide what fits in your garage size.
Table 1: Garage Size vs. Possible Workshop Features
| Garage Size (feet) | What You Can Fit | Best For |
|---|---|---|
| 10 x 10 (one car small) | One workbench (4 ft), wall tools, rolling cart | Small crafts, repairs, electronics |
| 12 x 20 (one car large) | Longer bench (6 ft), tool chest, shelf unit, dust collector | Woodworking, home DIY |
| 20 x 20 (two car) | Two benches, table saw on wheels, lumber rack, storage cabinets | Multiple hobbies, bigger projects |
After you measure and draw, you are ready to act. The next step is to clear out everything that does not belong.
Step 2: Clear Out the Clutter
Most garages are full of stuff you do not need. Old paint cans, broken toys, empty boxes, and holiday decorations. You cannot build a small home garage workshop in a messy space. So you need to sort.
Take everything out. I mean everything. Put it on your driveway or lawn. Then make three piles: keep, donate, throw away. Be honest. If you have not used a tool in two years, sell it or give it away. Keep only what you truly need for your workshop.
For things that stay in the garage but not in your workshop area (like holiday bins), put them on high shelves near the garage door. Or move them to a shed or attic. Your workshop zone should be free of unrelated clutter.
Once the space is empty, sweep the floor and walls. Look for cracks or holes. Fix them now before you set up your workshop.

Step 3: Choose the Right Flooring
Concrete is the standard garage floor. It is strong and cheap. But it is hard on your feet and back. Dropped tools can break. And concrete gets cold in winter.
You have options. You can add rubber mats or interlocking floor tiles. These are softer and warmer. They also protect your tools. Another choice is epoxy paint. It seals the concrete and makes cleaning easier. But it does not add cushion.
For most small home workshops, I suggest rubber floor mats in your main standing area. You can buy them in squares or rolls. They cost about two to three dollars per square foot. They reduce fatigue and noise.
If you stay with concrete, at least add an anti fatigue mat near your workbench. Your knees and back will thank you.
Step 4: Get Good Lighting
Bad lighting makes work hard and dangerous. You cannot see your pencil line or measure correctly. You might hurt yourself. So lighting is not a luxury. It is a must.
Garages usually have one bare bulb in the middle. That is not enough. You need bright, even light across your workbench and tool areas.
The best choice is LED shop lights. They are cheap to run, last for years, and give a clean white light. You can buy four foot LED fixtures for about 20 to 30 dollars each. Hang two or three over your bench. Add another near your tool storage.
Also add task lighting. A flexible arm lamp on your bench helps you see small details. And do not forget natural light. Keep windows clean and uncovered.
“Good light is half of good work. You cannot make what you cannot see.” – Norm Abram, master carpenter from The New Yankee Workshop
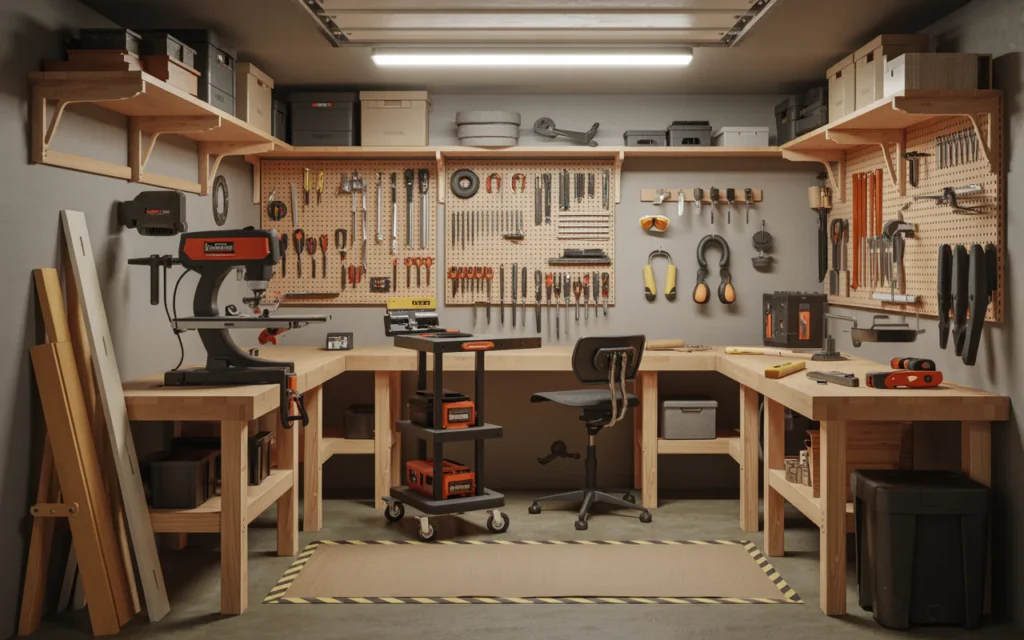
Step 5: Build or Buy a Workbench
Your workbench is the heart of your workshop. This is where you will saw, drill, glue, clamp, and build. You need a strong, flat, and stable bench.
You can build a simple bench using 2×4 lumber and a sheet of plywood. Plans are free online. A basic bench costs about 50 to 100 dollars in materials. Or you can buy a ready made bench from a hardware store for 150 to 300 dollars.
Workbench Height and Size
The standard bench height is 34 to 36 inches. That works for most people. But you can adjust. Stand with your arms at your side. Bend your elbow to 90 degrees. Your work surface should be at the height of your palm.
For a small garage, keep your bench under 6 feet long and 2 feet deep. Any bigger and it will eat up your floor space. Add locking casters to your bench. Then you can roll it against the wall when not in use, or pull it to the center for big projects.
Make your bench heavy. Use two layers of plywood for the top. Add a shelf underneath for storage. A heavy bench does not wobble when you saw or hammer.
Step 6: Pick Essential Tools
When you build a small home garage workshop, you do not need every tool. Start small. Buy tools as you need them for specific projects. This saves money and space.
Here is a starter list for a general DIY workshop:
- Hammer (16 oz)
- Screwdrivers (Phillips and flat)
- Tape measure (25 ft)
- Level (2 ft)
- Clamps (four of different sizes)
- Hand saw or circular saw
- Drill and drill bits
- Random orbit sander
- Work light
- Safety glasses and ear protection
As you get into more projects, add tools like a jigsaw, router, or miter saw. But only add one new tool per project. This keeps your spending and clutter in check.
Avoid large stationary tools if your garage is small. For example, a table saw takes up a lot of space. Instead, use a circular saw with a guide rail. Or buy a compact jobsite table saw that folds and rolls away.
Remember, the goal is to build a small home garage workshop, not a factory. A few good hand tools and two or three power tools are enough for years of projects.
Step 7: Set Up Smart Storage
Storage is what makes a small workshop work. If your tools do not have a home, they will end up in a pile on your bench. Then you cannot work. So plan your storage before you buy anything else.
Use wall space. Walls are free real estate. Install pegboard or French cleats. These systems let you hang tools in plain sight. You can see what you have and grab it fast.
Use shelves. Open shelves above your bench hold bins of screws, glue, and sandpaper. Use clear plastic bins with labels. Avoid deep cabinets. They hide things and waste space.
Use rolling carts. A cart with drawers can hold your most used tools. Roll it next to your bench when you work. Roll it under a shelf when you are done.
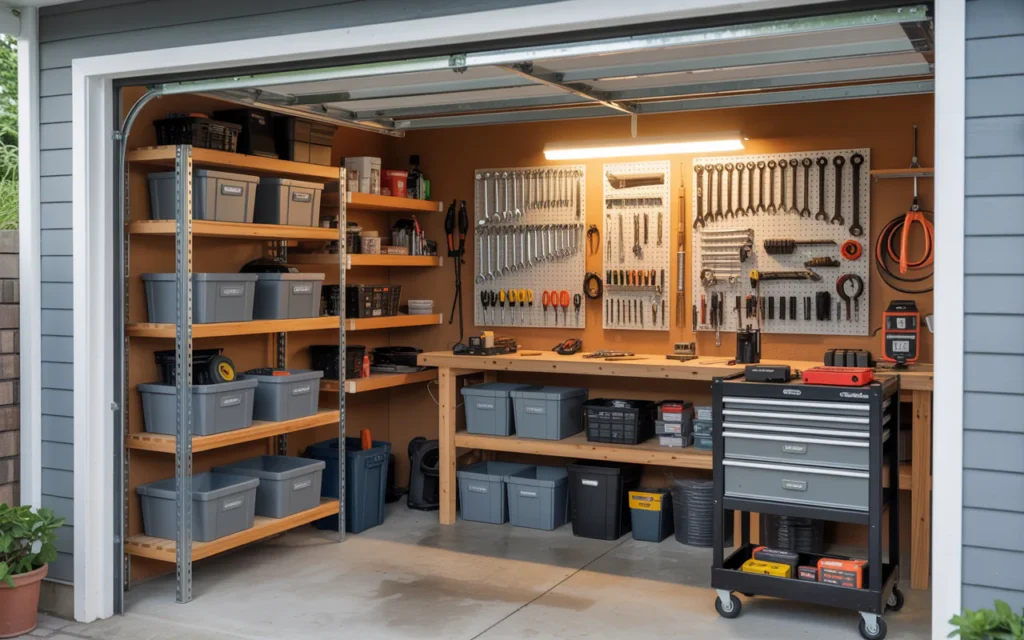
Table 2: Storage Solutions for Small Workshops
| Storage Type | Best For | Approximate Cost |
|---|---|---|
| Pegboard | Hanging hand tools (hammers, wrenches, pliers) | $20 for a 4×4 ft sheet |
| Wall shelves | Bins of nails, screws, paint, glue | $15 per shelf bracket and board |
| Rolling cart | Drill, driver, bits, clamps, small power tools | 50to100 |
| Magnetic strip | Metal tools like chisels, files, wrenches | 10to20 |
| Clear bins with lids | Bulk items, extra sandpaper, safety gear | 5to10 each |
Do not forget corner space. A corner shelf or a corner pegboard can hold less used items. And use the space under your workbench for a trash can or a small compressor.
Step 8: Add Power Outlets and Electrical Safety
Most garages have one or two outlets. That is not enough for a workshop. You will trip over extension cords. You will blow breakers. So you need more outlets.
Hire an electrician if you are not comfortable with wiring. Adding outlets is not very expensive. Plan for at least four outlets along your workbench wall. Put them every 4 to 6 feet. Also add one outlet on the ceiling for a garage door opener or a retractable cord reel.
Use 20 amp circuits for your workshop. Many power tools need that much power. Do not run your saw, dust collector, and lights on the same circuit.
Also add ground fault circuit interrupter (GFCI) outlets. They protect you from shock in wet or damp areas. Your garage counts as a damp location.
And label your breaker box. Write down which outlet is on which breaker. This helps a lot when you trip a circuit.
Step 9: Handle Ventilation and Dust Control
Dust is a big problem in workshops. Wood dust, metal dust, and paint fumes are not good to breathe. In a small garage, dust builds up fast because there is less air volume.
First, open your garage door when you work. That is the best ventilation. But in cold or hot weather, you might want the door closed. Then you need a fan. A box fan in a window can pull out dust and bring in fresh air.
Second, use a dust collector or a shop vacuum with a bag. Connect it to your sander or saw. This catches dust at the source. For small workshops, a shop vac with a cyclone separator works well.
Third, wear a good dust mask. Not a cloth mask. Use an N95 or better. Your lungs will stay healthy.
“Every cut makes dust. Every sanding makes more. Control the dust or it will control your shop.” – Stumpy Nubs, woodworking YouTuber
If you paint or use solvents, buy a small respirator with charcoal filters. Open a window and run a fan. Never sleep in a garage after using strong chemicals. The fumes can stay in the air.
Step 10: Focus on Safety First
A workshop is a place of sharp tools, electricity, and heavy objects. You must work safely. I have cut myself and hit my thumb with a hammer. Those mistakes hurt. They also slow down your projects.
Here are simple safety rules for your small home garage workshop:
- Wear safety glasses every time you cut, drill, or hammer.
- Use ear protection when running loud tools like saws or sanders.
- Tie back long hair and remove loose jewelry.
- Keep a first aid kit on the wall near the door.
- Have a fire extinguisher rated for electrical and wood fires (Class ABC).
- Unplug tools when you change blades or bits.
- Keep your floor clear of cords and scraps to avoid trips.
- Do not rush. Most accidents happen when you are tired or in a hurry.
Also teach any family member who uses your workshop the same rules. Post the rules on the wall as a reminder.
Frequently Asked Questions (FAQ)
How much does it cost to build a small home garage workshop?
You can start for as little as 200 to 500 dollars. This buys basic tools, a simple bench, and some lights. A more complete setup with better tools, flooring, and storage costs 1000 to 2000 dollars. The biggest costs are usually power tools and lighting. Buy used tools to save money.
Can I build a small home garage workshop in a one car garage?
Yes. Many people do it. In a one car garage, you lose the ability to park inside. But you gain a workshop. Focus on wall storage and a fold down or roll away bench. Keep your tool collection small. Use the space outside on good weather days for cutting long boards.
What are the best tools for a beginner workshop?
Start with a drill, a circular saw, a hammer, a tape measure, a square, and clamps. Add a sander and a jigsaw later. Avoid buying sets of 100 tools. You will only use 10 of them. Buy each tool as you need it for a specific project.
Do I need a permit to build a small home garage workshop?
You do not need a permit for basic storage, a workbench, or adding shelves. But you may need a permit for new electrical wiring, adding a sub panel, or changing the garage structure. Check with your local building department. It is better to ask first than to pay a fine later.
Conclusion
You do not need a big budget or a large building to have a great workshop. You just need a plan, some basic tools, and the willingness to start. I have given you ten steps to build a small home garage workshop. From planning your space to staying safe, each step moves you closer to a workshop you will love.
Start small. Clear one corner of your garage this weekend. Build a simple bench next weekend. Buy one new tool when you start your first project. Over time, your workshop will grow with your skills. Remember, every expert started with a messy bench and a few tools. The joy is in the making, not in the perfect setup.
“Do not wait for the perfect workshop. Start with what you have. Make something today.” – Ana White, furniture designer and author
Now go look at your garage. Pick a wall. Put up a pegboard. Hang your hammer. And begin your first project. You can do this.
Related posts
 Which Backup Camera Is Best For Cars
Looking for the best backup camera for cars? We tested top models like Wolfbox, LeeKooLuu, and Auto-Vox. This guide compares image quality, night vision, and installation…
 Best Bearing Press Kit for Automotive and General Repair Tasks
Compare the best bearing press kits for front wheel drive, bearing race, and seal installation. Find the right tool for your automotive repair needs. A reliable…
 Best Breaker Bar for Removing Lug Nuts: Top Picks and Buyer’s Guide
Find the best breaker bar for removing lug nuts with our detailed comparison. We review top models to help you choose the right tool for your…