To use hot air brush properly and get salon style blowouts at home, follow these steps on sectioning hair, choosing heat settings, and using rolling techniques for smooth volume.
A hot air brush can feel like magic. One minute you have wet, frizzy hair. The next, you have smooth, bouncy waves or a straight, sleek look. But if you have ever ended up with more tangles or less volume than you wanted, you know the tool is only part of the puzzle. The real secret is knowing how to use it right.
I have tested many of these brushes over the years, on my own hair and with friends and clients. The good news? Once you learn a few simple methods, it becomes the fastest tool in your bathroom. This guide will walk you through every step, from prepping your hair to adding the final touches. Let us get your hair looking its best.
What is a Hot Air Brush?
A hot air brush is a styling tool that combines a round brush with a hair dryer. The barrel of the brush heats up and has air vents. As you brush your hair, hot air flows through it. This dries and styles your hair at the same time. It is made to create volume, smooth frizz, and add bends or curls.
There are a few main types:
- Round Brushes: These are the most common. They come in many sizes. A large barrel gives loose waves. A small barrel makes tighter curls.
- Paddle Brushes: These have a flat, wide shape. They are best for straightening long hair and smoothing frizz. They do not add as much curl.
- Cylinder Brushes: These look like round brushes but are smooth, without bristles. They are good for creating very smooth, glassy finishes.
Getting Ready: Prep is Key
You cannot just jump in with the hot air brush on sopping wet hair. Preparation makes all the difference.
Start with clean hair. Use a shampoo and conditioner that fit your hair type. If your hair is fine, look for products that add volume. If your hair is thick or frizzy, look for smoothing or moisturizing ones.
Next, use a heat protectant. This is a non-negotiable step. A heat protectant spray or cream coats your hair. It shields it from the high heat of the tool. Spray it evenly through damp hair, focusing on the ends which are the oldest and most fragile part.
“The right products are not a luxury; they are the foundation of any good hair day,” says celebrity stylist Lisa Green.
Your hair should be towel-dried well before you start. It should be damp, not dripping wet. Very wet hair takes too long to dry with a hot air brush and can lead to over-styling.
Table 1: Hair Prep Checklist
| Step | Product Type | Why It Matters |
|---|---|---|
| 1. Cleanse | Shampoo for your hair type | Removes oil and buildup so style lasts. |
| 2. Condition | Conditioner for your hair type | Adds moisture, detangles, and protects. |
| 3. Protect | Heat protectant spray/cream | Forms a shield against heat damage. |
| 4. Detangle | Wide-tooth comb or wet brush | Removes knots for even styling, less breakage. |
| 5. Towel Dry | Microfiber towel or t-shirt | Removes excess water so hair is damp, not soaked. |
Choosing Your Settings and Tools
Most hot air brushes have two or three settings: heat and air speed. Some also have a cool shot button.
- High Heat/High Speed: Use this for the first pass on thick, coarse, or very damp hair. It helps dry the hair quickly.
- Medium Heat/Medium Speed: This is your main setting for most hair types. It is perfect for styling once hair is mostly dry.
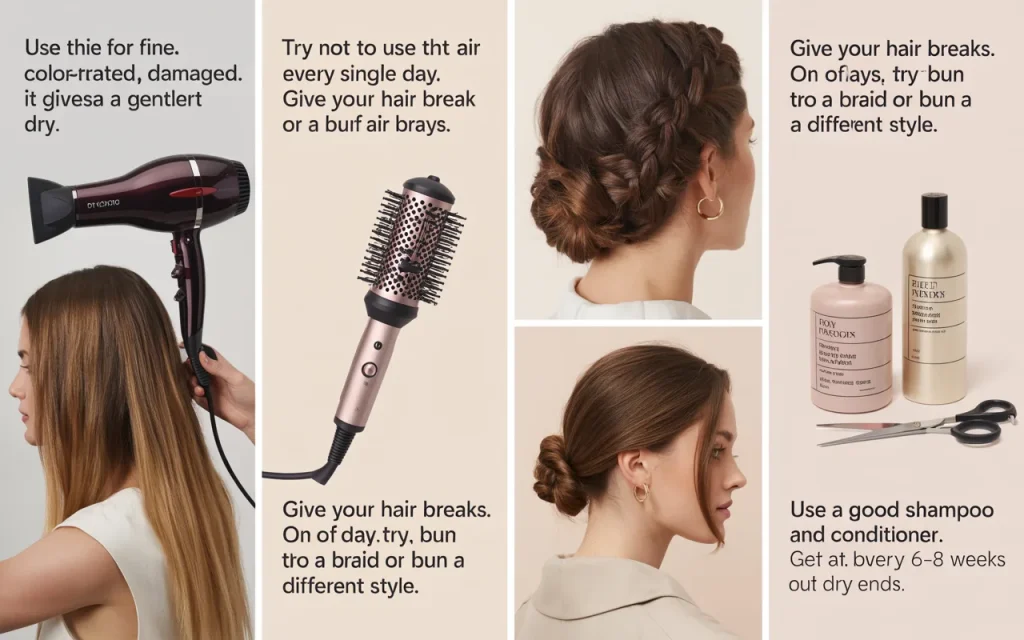
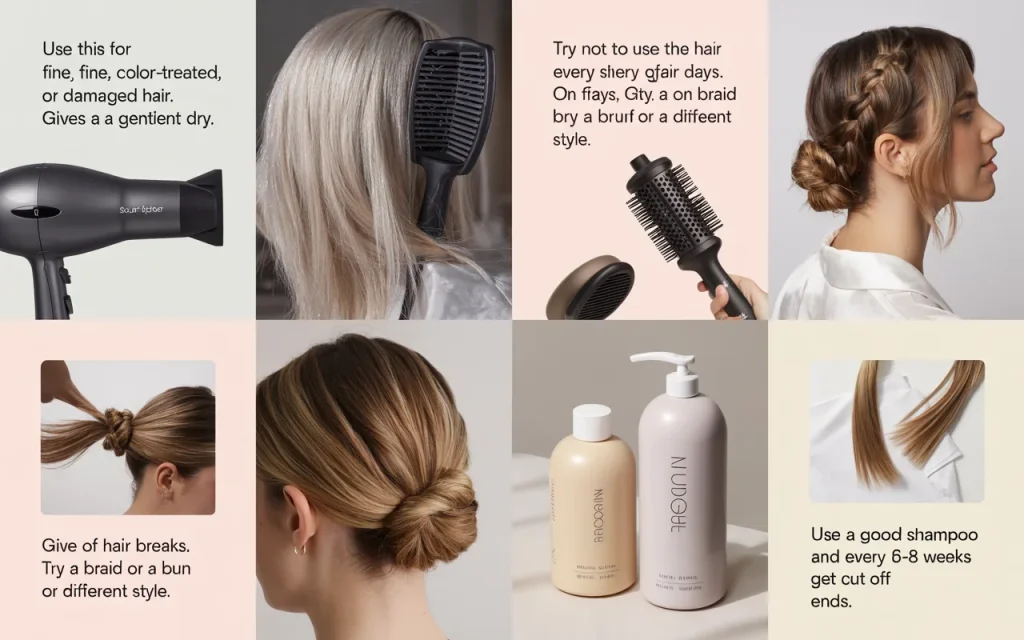
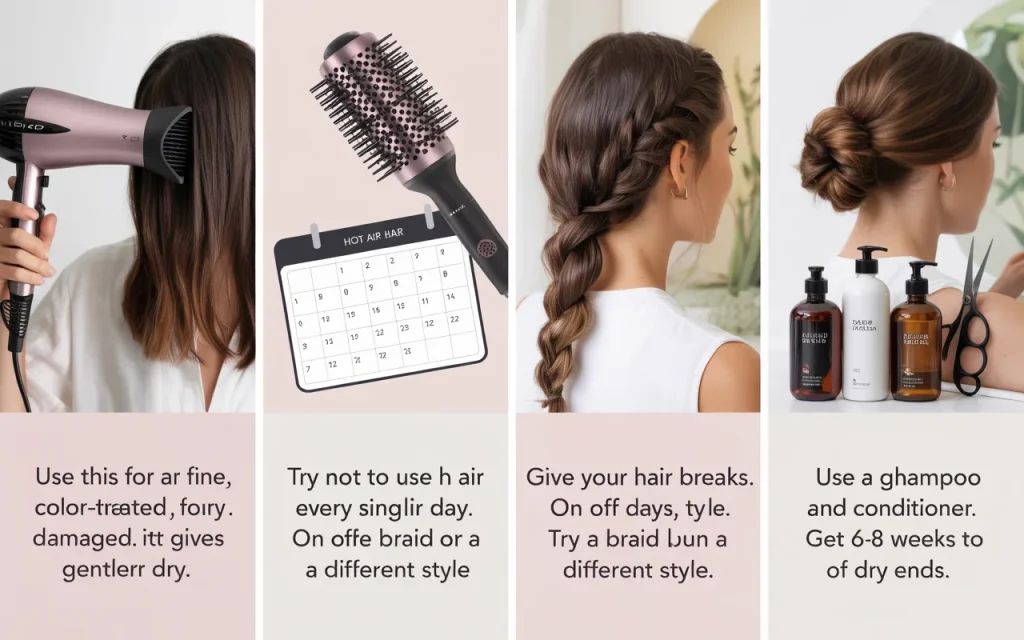
- Low Heat/Low Speed: Use this for fine, color-treated, or damaged hair. It gives a gentler dry.
- Cool Shot: This button blasts cool air. Use it at the end to “set” your style. It helps close the hair cuticle, locking in the shape and adding shine.
Picking the right brush size matters too. A large barrel (around 2 inches) is great for long hair. It gives soft waves and volume at the roots. A medium barrel (around 1.5 inches) works for shoulder-length hair. It creates bouncy curls. A small barrel (1 inch or less) is for short hair or very tight curls.
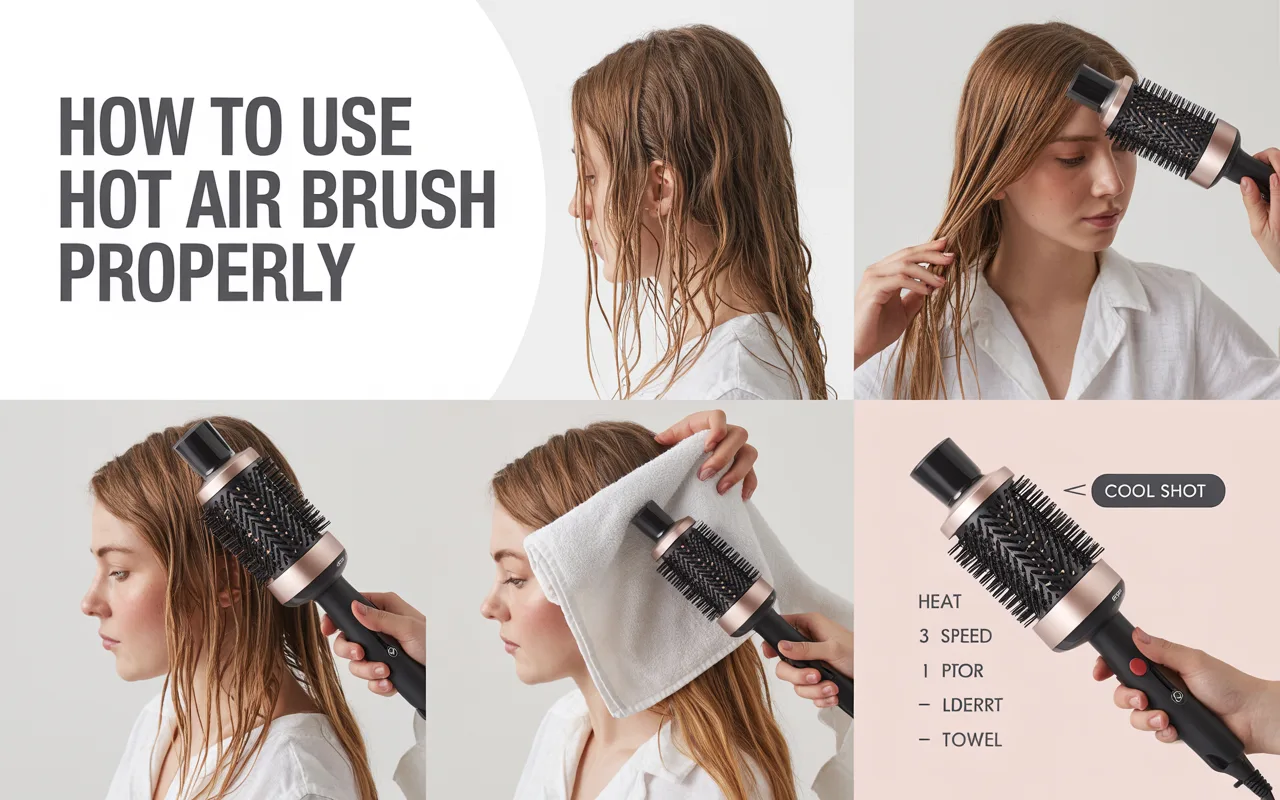
Step-by-Step Guide to Use Hot Air Brush Properly
Here is the core method. Follow these steps to use hot air brush properly every time.
1. Section Your Hair
This is the most important step for a smooth result. Clip the top half of your hair up. Start with the bottom layers. Take horizontal sections about 2-3 inches wide. Working in smaller sections lets the heat reach all the hair evenly.
2. Hold the Brush Correctly
Hold the brush so the bristles point downward, toward the floor. Your hand should grip the handle, not the hot barrel. Keep your fingers clear of the air vents.
3. The Rolling Technique
Place the brush under a section of hair, close to the roots. Slowly turn the brush away from your face. As you turn, gently pull the brush down the hair shaft toward the ends. The key is to keep tension gentle but firm. Do not wrap the hair too tight. Let the brush rotate smoothly.
4. Follow with the Dryer
As you roll and pull, direct the hot air flow down the hair shaft. This smooths the cuticle. Keep the brush moving. Do not hold it in one spot for more than a few seconds. Repeat this roll-and-pull motion 2-3 times per section until the hair is dry and styled.
5. Use the Cool Shot
Once the section is dry, hit the cool shot button. Hold the brush in place for 5-10 seconds. This cools the hair and sets the shape you created.
6. Work Your Way Up
Release another small section of hair from your clips. Repeat the process. Work from the back of your head to the sides, finishing with the top and front sections. For maximum root volume on the top layer, you can roll the brush upward and back, away from your face.
Tips for Different Hair Types
The basic steps are the same, but small changes can help you get better results for your specific hair.
For Fine or Thin Hair:
Use a lower heat setting to avoid damage. Start with completely towel-dried hair. A smaller brush can help create the look of more volume. Do not use heavy products. A light mousse or volumizing spray at the roots is best.
For Thick or Coarse Hair:
Use a higher heat setting to smooth the hair cuticle. Work in even smaller sections. A paddle brush or large round brush can help manage the volume. A smoothing serum applied to damp hair can help control frizz.
For Curly or Wavy Hair:
The goal is often to smooth frizz while keeping some body. Use a diffuser attachment if your brush has one. If not, use a large barrel brush on a medium heat setting. Stretch the curl gently as you dry. Finish with a light hair oil to add shine.
“Styling is about working with your hair’s natural texture, not fighting it,” notes hair expert David Chen.
For Damaged or Color-Treated Hair:
Always use the lowest heat setting possible. Be extra generous with heat protectant. Consider using the tool only on the top layers of hair, letting the underneath air dry. Deep condition your hair once a week.
Common Mistakes to Avoid
Even with a good plan, it is easy to slip up. Avoid these common errors.
- Using on Soaking Wet Hair: This takes forever and can cause frizz. Your hair should be damp.
- Skipping Heat Protectant: This leaves your hair open to heat damage, dryness, and breakage.
- Taking Sections That Are Too Big: The center of the section will stay wet and unstyled.
- Holding the Heat in One Spot: This can burn your hair or scalp. Keep the brush moving.
- Forgetting the Cool Shot: Your style will fall out faster without this setting step.
- Brushing Through the Style After: Once your hair is cool and set, try not to brush it out. Use your fingers to gently shape it instead.
How to Keep Your Hair Healthy
Heat tools can be safe if you are smart. Always use a heat protectant. Try not to use the hot air brush every single day. Give your hair breaks. On off days, try a braid or a bun for a different style.
Use a good shampoo and conditioner. Get a trim every 6-8 weeks to cut off dry ends. This keeps your hair looking fresh. A weekly deep conditioning mask can repair moisture.
Table 2: Quick Troubleshooting Guide
| Problem | Likely Cause | Quick Fix |
|---|---|---|
| Hair gets tangled | Bristles too grippy, section too big. | Use a paddle brush first, take smaller sections. |
| No volume at roots | Started with top sections, brushed hair flat. | Start at bottom, roll top sections upward. |
| Style does not last | Used on wet hair, skipped cool shot. | Ensure hair is damp-dry, always use cool air to set. |
| Hair looks frizzy | High heat on fine hair, no smoothing product. | Use medium heat, apply a light serum first. |
| Hair feels dry | No heat protectant, heat too high. | Always use protectant, choose lower setting. |
Frequently Asked Questions
Can I use a hot air brush on dry hair?
Yes, you can. It is a great way to touch up second-day hair or smooth frizz. Use a lower heat setting. Spray a light mist of heat protectant or water first.
How is this different from a regular hair dryer and brush?
The main difference is that you only need one hand. The drying and styling happen together. It is often faster and easier for creating curls and volume at the roots.
Is a hot air brush bad for your hair?
Any heat tool can cause damage if used wrong. But if you use a heat protectant, choose the right heat level, and keep the brush moving, a hot air brush can be gentler than some other tools because it combines steps.
How often should I clean my hot air brush?
Clean it every two weeks. Hair and product build up on the bristles. Remove the hair wrapped around the base. Wipe the barrel with a damp cloth when it is cool. Some brush heads are removable and can be washed.
Can I use it to create straight hair?
Yes. Use a paddle brush attachment or a large, round brush. Pull the brush through your hair in slow, straight motions from roots to ends. Do not roll it.
Conclusion
Learning how to use hot air brush properly turns a good tool into a great one. It is all about preparation, sectioning, and technique. Remember to prep with a heat protectant, work in small sections, and use that cool shot to lock in your style. With a little practice, you will be able to create a salon-quality blowout in your own home, quickly and easily.
“The best hair tool is the one you know how to use with confidence,” says stylist Maria Rodriguez.
Your hair is as unique as you are. So feel free to adjust the heat, the section size, and the products until you find what works best for your texture and length. Have fun with it, and enjoy your beautiful, styled hair.
5 Comments